
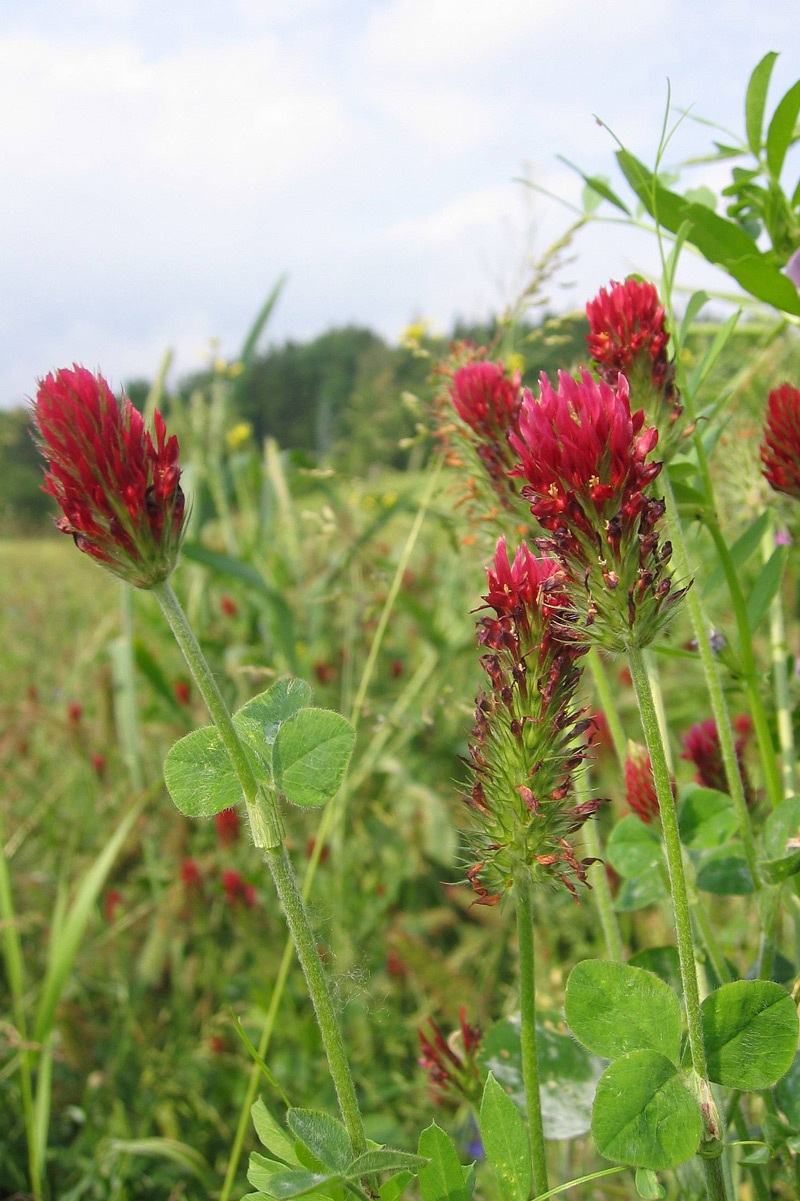
Crimson clover is one of the most versatile green manure plants for the vegetable garden. Sown into an empty bed between August and September, it covers the soil over winter, busily collects nitrogen from the air and transforms into a striking sea of flowers in spring that draws in bees and other pollinators. The crimson flower spikes on slightly hairy stems have also earned it the name Italian clover.
The plant belongs to the legume family and originally comes from the Mediterranean region. It is winter annual: after an autumn sowing it germinates before the frost, overwinters as a young stand and flowers the following spring. After that it dies off and you work it into the soil. Depending on the site, it reaches between 20 and 50 cm in height. The upright, slightly rough stems carry the typical trifoliate clover leaves with oval to heart-shaped leaflets.
The real magic happens underground: crimson clover lives in symbiosis with nodule bacteria of the genus Rhizobium, which fix atmospheric nitrogen directly in the soil. Depending on conditions, roughly 15 g per square metre.
The taproot reaches down to 90 cm, breaking up compacted layers and leaving behind fine channels that support soil life after it dies back. If you use crimson clover over several years, you will often notice a marked increase in earthworm populations.
In Gertrud Franck's row companion planting system, crimson clover complements the concept as a winter-hardy green manure on plots that are cleared in autumn and earmarked for heavy feeders such as cabbage or tomatoes in spring. It covers the soil, prevents nutrient leaching and delivers fresh nitrogen when worked in. For the clover paths in the Langerhorst family system, however, it is not suitable because it grows upright and cannot tolerate being walked on. White clover or subterranean clover work better there.
Facts and figures
Planting & harvest times of Crimson clover
Green manureDirect sowing from Early August to Mid September. Incorporation takes place around Early April until Late May next year.
Green manureDirect sowing from Early March to Late April. Incorporation takes place around Early May until Late July.
Sow Crimson clover
Crimson clover is always sown directly into the bed — raising seedlings indoors is neither necessary nor useful. The main sowing window for winter green manure is between early August and early September. The earlier you sow, the better the plants can establish before the first frost. Sowing after mid-September is risky, because the young plants often fail to develop enough root mass to survive the winter well.
If you want to use crimson clover as a bee pasture or for early ground cover, you can also sow in March or April. It will then flower in the same year.
For sowing, loosen the soil and work the seeds in 1 to 2 cm deep. Broadcasting works best. The sowing rate is roughly 25 to 30 g per square metre. Since the seeds are quite fine, it helps to mix them with a little sand before scattering. Afterwards, lightly press down or rake in. With sufficient soil moisture, crimson clover germinates quickly. In dry spells, water occasionally during the first few weeks.
Location and soil
Crimson clover likes it sunny to partially shaded. Under light fruit trees it still puts on good growth, but it cannot cope with really dense shade. It prefers medium to light, well-drained, humus-rich soil. Heavy, waterlogged or peaty soils are unsuitable, as are very dry sites.
The pH should be between 5.5 and 7.0. An adequate lime content matters, because the nodule bacteria only work effectively under those conditions. On plots where clover has never grown before, it can be worth using seed inoculated with Rhizobium.
One key point: crimson clover cannot tolerate foot traffic. Unlike white clover, it is not suited as a walkable surface. Don't sow it where you regularly work during winter.
Good and bad companions of Crimson clover
Brassicas such as broccoli, cauliflower and white cabbage benefit from crimson clover. The clover's scent is said to confuse cabbage root fly and cabbage white butterfly. Sown around cabbage plants, it can form a natural protective barrier.
Predecessors and successors of Crimson clover
Crop rotation is crimson clover's greatest strength. As a winter green manure it bridges the gap between summer and spring crops and leaves the soil in noticeably better condition.
Sowing crimson clover makes sense whenever a crop clears the bed by early September at the latest: early potatoes, early summer vegetables or brassicas fit the timing well, because there is still enough growing time before the first frost arrives.
After crimson clover, heavy feeders do best: cabbage, tomatoes, squash and courgettes make excellent use of the released nitrogen. Potatoes and carrots also benefit from the loose soil structure the clover leaves behind. With carrots, though, you should wait 3 to 4 weeks after working in the clover, as they react sensitively to too much fresh nitrogen.
Crimson clover is not suitable for plots where beans or other legumes have been or will be grown. Otherwise you risk soil fatigue and shared diseases. You should also leave a break between two clover crops on the same plot — this applies to other clover species as well.
Varieties
In the home garden, crimson clover is usually sold as simple species seed without a variety name. If you specifically look for named varieties, the agricultural sector is the place to search. There you will find proven varieties like 'Contea' as a reliable all-rounder or newer breeds like 'Rokali', which stand out for their good resistance to leaf diseases.
For the garden, the choice of variety matters less than fresh seed with high germination rates. On soils where clover has never grown before, seed inoculated with Rhizobium bacteria is worthwhile so that nitrogen fixation works well from the start.
Care and fertilising
After sowing, you only need to keep an eye on even moisture during the first few weeks. Once the plants have established well, they cope surprisingly well with drought. Waterlogging, however, they cannot tolerate at all.
You don't need to feed crimson clover — that is precisely its job: it supplies itself with nitrogen from the air. On very depleted soils, a basic supply of phosphorus and potassium can help.
In spring comes the most important step: working it in. Ideally, cut the clover just before or at the start of flowering, when the nitrogen content is at its peak. Bury the plant material shallowly or rotovate it in, no deeper than 5 to 10 cm, so that decomposition can proceed aerobically. Then wait 2 to 4 weeks before planting the follow-on crop. Alternatively, you can mow the growth and leave it as mulch while the roots stay in the soil and decompose there.
During winter, crimson clover needs no special care. In severe bare frost below minus 10 to minus 15 degrees without a protective snow cover, it can die off. If you want to play it safe, combine it with winter vetch or winter rye.
Diseases and pests
The most dangerous foe of crimson clover is clover rot (Sclerotinia trifoliorum). This fungus attacks stems and leaves, forms a white mould coating and black sclerotia that survive in the soil for years. It spreads particularly in mild, damp winters. The best prevention is observing cultivation breaks: at least 3 to 4 years between two clover species on the same plot.
Clover anthracnose (Kabatiella caulivora) shows up as dark spots on stems and leaves and can noticeably weaken growth. Powdery mildew occasionally appears in dry, warm weather but usually disappears on its own once conditions turn more humid.
Aphids and weevils can occur but rarely cause significant damage in the home garden. In wildlife-friendly gardens, ladybirds and parasitic wasps generally sort that out by themselves. Stem nematodes (Ditylenchus dipsaci) can be more problematic, as they also attack other crops. Here, too, consistent cultivation breaks offer the most effective protection.
Harvest and processing
The ideal time to work it in as green manure is just before or at the start of flowering, when the nutrient concentration in the plant mass is at its highest. Cut the plants and work them shallowly into the soil, or leave them on the bed as a mulch layer. If you want to save your own seed, let a few plants stand until fully ripe. Once the flower spikes are completely brown and dry, you can cut them off and thresh out the seeds. Fresh seed germinates far more reliably than older stock. As a side note: the seeds are edible for humans too and taste quite decent roasted in salads. Young sprouts can also be eaten. In everyday garden life, though, that plays a minor role — the real value lies underground.